Hello everyone! Hope your Christmas was wonderful. I wanted to show a quick post about a quick finishing job I did the other day. I found another PS Santa on Aida that may have been from my SIL and needed to complete the ornament for an unplanned gift. I tried the envelope method and loved the ease. The next one won't be as hurried and will have little buttons sewn down the flap or X's stitched along the fold. I've seen a few finishes that were interesting on the back and never bother to do that myself, but that will change with this method. The chenille or rick rack trims, lace, or a multitude of items can be used to dress up (or hide) the center opening and create a great look. That didn't happen here! It was a real rush job. So here's the simple and easy procedure...
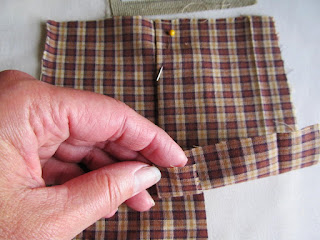
The backing was cut twice the width of the project and then ripped down the center for two pieces. Fold and press the edges in about an inch and then overlap and pin shut. From then on, follow the usual right sides together but sew on all FOUR sides. Press the seams, clip the corners.

Turn right side out, open the flap and fill. Pull the two edges to overlap evenly and either glue or hand stitch closed. Then have your fun with buttons or trim. To make it even easier, you can sew on the rick rack or lace to the folded edge before stitching the back to the front. Mine is bare which is OK too. You can get all the edges and corners nice and plump without having to hand stitch any of the linen or other background fabric. I used fabric glue to close the flap and would have liked to have sewn on those little buttons but had no time. If you use the glue, it may be hard to get the needle through it if you want to stitch X's over the opening or buttons on, so test your glue on a scrap, or sew the buttons on before gluing closed.
So here's the pillow from the front. But take a look at how much nicer the bottom edge is without my usual pucker.
So many ideas about how to dress up the back - even a loop with a large fancy button. I am planning on this method from now on! Which you probably already know about and use but I'm yapping about it anyway cause I'm excited.
A few more things. Food.
This red grape salad was out of this world. Haven't had it for a number of years and when a friend brought it to dinner, oh my, were we glad! It's cream cheese, sour cream, sugar, tossed with red seedless grapes and topped with a brown sugar pecan topping. Heaven.
And can you believe this? I found the 4' tree that I wanted to buy. They moved it into the foyer and draped red tulle and cotton balls over it which is why I couldn't find it last week. 75% off! My husband saw me carrying the 4' bag and rolled his eyes. I told him I may sell the 3'. I need an intervention. But I also came up with an idea for lights. Since these small primitive trees are very hard to string with lights, how about using honeysuckle, raffia, or thin grapevines intertwined with the teeny light strings and draping it like garland over the branches? Huh? Good idea? I think so. Lights, primitive, no wires showing, happy dance. Except for that white crap you can see out the window.
Next time, the new sampler project.
I'll leave you with two more darling freebies I recently found.
Gettysburg Homestead has a sweet little peacock bag found HERE and The Sampler Girl has a kitty found HERE.
Have a wonderful week - thank you for visiting, I really appreciate your support - stay safe!


No comments:
Post a Comment