Collar your hoodie #2 - unlined pullover

Hi all.  I don't know if anyone is really interested in getting rid of their hoods, but I will post the other methods anyway!  These pullover types are nice but I'm strangling myself when I have a flash, trying to pull it away.  This one is the fleece fleece - same on both sides - very soft and stretchy and doesn't ravel.  
 First off, push the hood down inside the neck leaving about 2" in the back and 3" in the front standing.  Pin all around, trying to get a smooth fold with no pulling.  Just keep repinning - it will eventually smooth out, adjusting the collar height as you go along. You can slit the top of the hood open if it helps, or not, in case you change your mind about the project.  Fold the shirt in half to see if the collar is the same height on both sides, or measure, and make sure the front edges match.  Now you have two options.  You can sew it as is, or add the masking tape to help with stretching.  I used a fabric marker to show you where the tape would be placed, which is directly above the taped neck seam that you can feel through the fabric. 

Pinning all the way around the neck on the outside of the shirt is really good enough.
You absolutely need to use the stretch stitch setting on your machine for the sewing.  You will stitch in the ditch of the neck seam on the outside of the shirt, and also run a second row right over the topstitching.  This is a stand up collar so it's important to take your time stitching these two rows and following the lines already there.  Once you've completed the ditch stitching, move your pins to below the topstitching to prevent stretching, and complete that row of sewing.  If you're concerned about stretching and pulling, start from the back center and work towards the front edge on each side, and reduce presser foot tension.
Once both rows are sewn, remove all the pins and cut off the excess.  My grommets were not attached evenly which wasn't noticeable with the hood.  This time I took the ties out but will now insert them and make a larger knot so it's not noticeable.

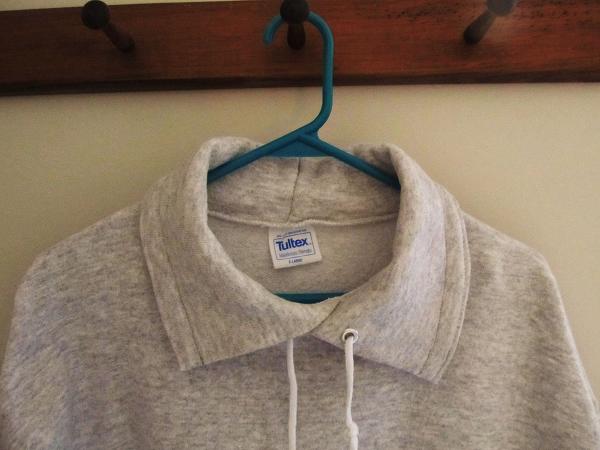
This collar does not come all the way to the front edge inside, which is why I turned it into a standing collar instead of folded over.  You can see the finished stitching at the neck's back.  I'm now working on the zippered jacket hoodie, which I never did before.  I dislike them more than the pullover and am anxious to see how they come out.
Still stitching Lucy and still making errors but most can be incorporated.  The floral design is all over the place so there is no reason to remove and re-do.  I ran into one of the long closed needlework shop owners and it was so nice to see her.  See was surprised that I was stitching again and I was surprised that she isn't!  My landscaper is 5 weeks past due, two contractors never showed up, and the custom kitchen man was to call two weeks ago.  Typical.   Tomorrow (or Wednesday) will be the last boring post about hoodies and I hope to have Lucy progress to show.
Have a great day!

Collar your hoodie #1- the lined pullover


Hiya.  This post is about turning your lined hoodie into a collar.  Keep in mind, I have no patience so measuring, precise seams, and finesse, are not a concern of mine.   These sweats are for working outside and I just wanted to get rid of the bulk on a few. 
There will be three separate posts because of the amount of photos and different style hoods.  The first is the easiest of all - the lined hood.   Turn the hood down to the shirt and pin along the entire area to see how wide you want the collar.   The front throat area is always cut lower than the back so that area will be longer, which is why you can't just use one measurement all the way around.
Start at the back seam and work towards the front edges.  You can cut the very top seam of the hood open if it helps.  Every shirt is different and should be checked like this, but I didn't since I've done this before. 


I measured the center back of a jacket collar to come up with my width.  Pinned the two layers of the hood fabric together (outside and lining) to make sure it didn't shift and turned the shirt inside out.  Matching front edges I laid the hood on its side smoothing it out.  I measured out from the center back seam, using masking tape as the guide.  The tape edge closest to the neck will be where the collar ends, the edge toward the hood's top will be where you sew.
When running the tape straight, you'll see that the front edge of the hood will have a wider collar measurement since the neck area is cut lower on the shirt.  Fold the piece in half and check to see if the tape lines up so you know your front edges will be even.  This is real professional, isn't it?
Take a look at the overall line and measure from the shoulder seam to the tape on each side to see if they are even.  Close enough?  Moving on.  Stitch a seam right along the outside edge of the tape, which would be toward the top of the hood, not the body of the shirt.  Now you can cut off the hood top from the stitching line and remove the pins.
Here's the only place that has a snag.  The back seam of this hood was stitched to the lining and I needed to open that seam in order to pull the two layers apart.  I just clipped it open enough for this next step, which is pushing the seam up into the collar. 
Try to keep the seam in the center and then pin the edges shut, encasing it completely.  Having this fold a little longer on the top side of the collar, and less on the bottom, will make it lay nicer.  I didn't care.  But I did fold the collar down (like it will be worn) and checked to make sure I didn't have one side of the fold pulled tighter creating an uneven edge.  Just make sure they meet as you're sewing.  You can leave it as is, or run another line of stitching up from the edge, which makes a little padded detail because of the seam that's stuffed inside.
 TA-DA!
You now have a collared pullover sweatshirt.  Another way I've done this was instead of pushing the seam inside, I used quilt binding (or double fold bias tape) to encase the sewn edge and match the fabric appliques I added to cover the stains embellish the shirt, or used the same fabric as the appliques.  Running it along the front edges hides the grommets too.  I didn't bother pulling out the cords - you can - or not.  If you're concerned about the collar not being wide enough, tape and sew out a little further than you planned.  You can always sew another seam in closer to make it smaller if need be.   This fabric was fleece lined knit, not the fuzzy fleece that is the same on both sides.  That's the next one, with a stand up collar.  I hope this isn't too confusing.  It's really simple and once you play around with the hood and get it to lay properly before stitching, you'll see what will work the best.  The tape is not only a guide, but also to keep it from stretching as you sew.  Part #2 later!!

My blue stems and tablecloth curtains

Hi everyone.  Hope you had a good week and will be enjoying this weekend.  Just wanted to boast a little ~ I haven't taken a match to Lucy.  That's right.  She is a royal pain (but it's my fault) but unlike the old days when she would have been burned in the barrel, she is intact and just fine.  Except for being in shock over the cuss words that her young ears aren't accustomed to.  Here is the latest screw up of mine.  I told you about the darker and lighter x's as color symbols, but of course, I forgot about them and just went along my merry way.  The large floral design's stems and leaves and outlines were x's, and I had just completed a tan x section and continued on.  It never occurred to me that the stems could be blue, until I finally looked at the color photo. 
Yikes.  Damn.  I surprised myself and removed the entire design and started over.   It was a lot of time wasted, but I am determined to finish this project before moving on and can't wait to get to the houses.   They should be much quicker than this section.  I'm starting to see the end of the tunnel!
 I also wanted to show you my stained tablecloths.   There are always a few small spots on my tablecloths that seem to defy removal.  These are the homespun 100% heavy woven cotton type with fringe.  I decided to cut them to size and fringe the cut edge.   Using a small nail, I just poke the fabric over it, and use jute to make a tie back.  The small stains aren't noticeable at all and being 100% cotton, they can easily be bleached out or dyed.  They are pretty reasonable to purchase new for a heavy curtain if you like this style, or put your old tablecloths to good use.  If you prefer just a valance, you could get several from one cloth.  For bathrooms, remove the tieback and the heavy fabric affords privacy.  You already know this, don't you.  Here's a beige that I bleached out, and a mustard/ivory pattern that is a 52x52 size and not cut down.
   

 Whenever I took Mom somewhere, right before we left she would ask "are you going to comb that hair?".  And when I would wash the curtains - I have others that are just hanging fringed fabric in a valance style - she would ask "are you ever going to buy real curtains and take down those rags?".  I didn't start stitching again until after she passed and I can just imagine what she would have said about the "aged" pieces!
Today I am turning my hoodies into regular collars.  I found a great deal in tall sizes so purchased several, but I hate hoodies.  The back pulls down, my shoulder bag always catches the hood, and I never use them anyway so I came up with a solution.  Next post, I'll show you the method, or a large fire.
Have a great weekend!  Stay safe ~ thank you for visiting!

Ebay listing

Hello everyone.  I wanted to let you know that I listed the charts this evening and you can find them HERE.  My EBay seller name is early-works.
I received my two new sampler charts today and here they are.
I continue having problems with Lucy.  Twice I've come across a linen thread that was thick and fuzzy and when I removed the fuzz, the thread was broken.  I raveled a thread from the linen edge and wove it in and you really can't tell at all that there was a break.  Hopefully, the worst is over, and I am on the bottom houses and floral now.
I stopped at the antique mall today (which has extremely few primitives) and I brought home a nicely rusted and larger oil can for a sewing project, and a wooden spool that I can run hemp through and hang a stitched piece from.    On my stairs, I always hang baskets from the handrail brackets to hold the multitude of crap that needs to be taken up while keeping the steps cleared.  Somewhat.  So I asked Mark if he would make a hook for me that hangs two ways.  Voila.  When the hook on the bottom goes at an angle from the top one, it doesn't balance correctly since the weight is offside.  Once a basket is on it, the weight hangs it straight.  I have one on every bracket and told him to make a few that I can sell when I start Etsy-ing.  That large blue jar on the step is one of several that I've had for many many years.  Not sure what's in it anymore!  I used to purchase fixatives, drieds, and oils for potpourri that I sold at the stitchery shop.  Our linens sure smelled good!  I believe these pretty looking rocks in the jar are a fixative (not orris root) but I can't remember the name. 
I'm done.  Had a few days of not being up to par but all is well now and I plan on getting as much done as I can because, I'll say it again, I can't wait to be done with this project.
Enjoy the rest of your week and stay safe. 
Thank you so much for your visits!


Oldies but goodies

Hello and how are you today?  I was dusting and decided to show a few of my favorite samplers, all of them oldies but goodies.  I'm not positive about origin on every one, since I DESTROYED them many years ago.  I saw no purpose in keeping something I had no intention of using again.  AUGH!!!!
The Lords' Prayer
Stoney Creek
Lots of metallic threads
I still have this chart


Lydia Bond
The Examplarery


Safrona Ager
The Examplarery


Chloe Lincoln
                                    Sheepish Designs


Aires of the Green
Sheepish Designs
Margaret Blackington
                      Scarlet Letter


Salina Dunwoody
Sheepish Antiques


Hannah Breed
Scarlet Letter


Phebe Smith
Scarlet Letter


Hannah Gibson
Simply Samplers


McCarthy Sampler
Sheepish Designs


Almira Eaton
The Examplarery?


Remember my finding the filth on the inside of the glass even with a sealed dust jacket?  Still undecided if I will open them all for a good cleaning.


I finally finished the eyelet stitches on Lucy after having to rip out several letters and start over.  I had trouble with the color symbols again.  The next border is rice stitch and I've decided to go low carb and dump it.  I am so anxious to start something smaller so standard X's is what the border will be.  You can see from the samplers above that I'm not used to very large pieces.  Fanny Erb and France F (on the basket) are also favorites but you've already seen them.
That's all for today.
Thank you so much for your comments and visits and emails.  I truly appreciate each and every one.  And if I would quit finding more blogs, I would have more stitches completed.  You are addictive!!!

A little chart for you part 2 and an egg critter

Hiya.  Me again.  In case you downloaded the chart or were interested in stitching this, I thought I would show you the update that I changed on the original post.  I don't know how to publish the edited version as a new post so here's the chart with the verse.  So many emails from readers (THANK YOU!!) that like the chart but knew that the initials wouldn't work, so I graphed two different lines if you would prefer either of these.  It could be stitched without the verse, too.  On 28 count it would fit in a 5x7 frame if you remove the entire top branch, or without the verse and roots.  So here you go.


And now for the egg critter.  I made a few hard boiled eggs for a chicken salad and look what I got.  This never happened before!!  The entire yolk held together and scared the heck out of me when I took the lid off the pan.  I thought I boiled a baby chick!!  The rest is still in the shell. 
That's it!!

Later!!

A little chart for you

Hello stitchers.  I was searching for lost floss, missing charts, and the new purchases which have all seemed to run off.  In the midst of throwing things from boxes and folders, I came across one of my graphs that I never stitched.  I wanted to stitch something in remembrance of family members that I could add to as time passed.  I planned on finishing the back with the envelope method so I could open to add initials.   The scan just wasn't showing the grid clearly so I transferred it to a stitch program for more clarity.    Since I never stitched it, there is nothing to show, but I thought if some of you are adventurous and like this idea, go for it.  When I first worked it out, I had planned on family initials of those passed in the bottom area stitched over one in a little box.  Well, where do you draw the line?  I've lost so many aunts, uncles, my parents, in-laws, and of course, pets, that I considered making the base of the tree longer to accommodate a second row.  The more I look at it, I like it without the initials and really don't need them to remember loved ones when I see this.  So if you would like to stitch this, with or without personalization, please send me a photo when completed.  The colors are simple, and with unbleached linen, 644 is great, but on a lighter ground, 3023 is better.  I mentioned that mom has been on my mind more so lately, and her birthday is the 23rd, so I found it poignant that I came across this chart today.  I just thought of maybe a better idea - how about an appropriate verse or quote over one at the bottom?  No?  A short one over two?  No?  Just a thought.  Edited - I redid the chart, taking out the initials and adding the words at the bottom. Two choices.
These are the colors on unbleached linen.  The initials were going to be done in a deep red but now I think 3021 or the 644 would be better.  I don't remember how to show a chart for copying so if any one is interested but has a problem, let me know.  I think you click on the photo, it enlarges, and then you right click and "save".  Pass the fish oil please!!  I want my old sharp memory back!!


Also wanted to show the ground cover I planted late fall (don't mind the weeds -haven't worked outside yet).  This is black scallop ajuga and I was pleasantly surprised at these bright blue spring flowers.  It was raining and dark when I took the photo so you can imagine how bright they are in sunlight.  The leaves are a very dark crimson and I love this little plant.
That's it.  Quick post.  Just wanted to pass this along.
Stay safe - thank you for visiting.


make the t shirts from here

T-shirt transfer-this is the only method that I ever try if you have a shirt I own. You buy a t-shirt transfer sheets, print design, and ir...